Today you will have half of the class to finish your Christmas cards and submit these to me. Submit only your best 1-you can choose between the photo card or the illustration. Post this to your blog.
Friday, 16 December 2016
Wednesday, 14 December 2016
December 13th-Greeting Cards Day 2
We will start off today by exploring dafont.com and I will show you how to install custom fonts.
Here is some font inspiration for your holiday cards. If you'd like, you can create some cards without using photos and only using vector graphics like the first one below. I would like you to create at least 1 card with your own photo though:


Here is some font inspiration for your holiday cards. If you'd like, you can create some cards without using photos and only using vector graphics like the first one below. I would like you to create at least 1 card with your own photo though:


Tuesday, 13 December 2016
December 13th-Greeting Cards
Today we will begin a mini 2 day assignment creating Christmas cards that you can print to give out for Christmas! I am away today but below are clear instructions about what today and Wednesday will look like. I will be back for tomorrow's class.
There will be 2 parts to this: capturing a holiday photo and designing the card in illustrator with nice type face, kerning, font choice, using various type tools, etc.
PART I: Tuesday
*Can 1 person volunteer to show Owen how to type on a path, 1 person show him how to do kerning, 1 person show him how to type inside a shape, and someone else show him the vertical type tool?
To set up your illustrator document please follow the following steps:
http://www.mmprint.com/blog/2010/beginner-tutorial-design-printready-holiday-greeting-card-adobe-illustrator/
After you have set up your document, you can go outside and take a photo of a winter scene. Take a bunch of photos so you have lots of options to work with. You will only be allowed 20 minutes outside so use your time well. When you come back, you will need to do some editing in Photoshop. You need to edit 3 photos.
*Please look at the photo tips for success that I posted last class before you take out a camera.
-You can choose to edit it using the basic workflow in Photoshop you used by first adjusting the Levels, then the Colour Saturation, and the Vibrancy. Please don't do any cheesy effects. Anything that looks great and enhances your photo.
PART II: Wednesday
Working with font-today we will begin applying font to our card using some of the tools we learned about on Friday and exploring the website dafont.com. If you finish taking your photos, setting up your illustrator file, and editing your photos on photoshop (at least 3) you can explore dafont.com today and begin choosing some fonts for Wednesday's class. Write down the name of your fonts so you don't need to search for them again.
Friday, 9 December 2016
December 9th- Introduction to Type
Hello!
Today we are going to spend some time playing with the type tool in illustrator. We will explore the type and charcters windows-learn about kerning, type area tool and type on a path.
On Monday we will begin an assignment where we will be creating our own Christmas cards. After you learn about some of the options in illustrator you will have some time to take out one of our new cameras and do some outdoor shots for your Christmas card! Take lots so you have a variety to work with. If you are done early you can edit the photos in photoshop (think of the basic workflow types: adjust the levels, colour saturation, and vibrancy)
Try going to this site and doing the kerning challenge!: http://type.method.ac/
On your blog tell me how to you did! Were you surprised at your kerning abilities or inabilities? Have you ever noticed good or bad kerning before? Was the mark you were given at the end?

Tips for success:
No people
Shallow Depth of Field
Be aware of your footprints-don't want through an area that you intend to take a photo of!
Slightly overexpose your images for whiter snow (overexposure is easier to fix than under exposure!)
Break up your shots-don't photograph only snow
Don't worry about the colours being bland-you can add fun colour with text later, a simpler photo is better.
Dont try to keep the camera warm. The cold is fine for the camera but keeping it inside your jacket, etc, can cause a foggy lense
Today we are going to spend some time playing with the type tool in illustrator. We will explore the type and charcters windows-learn about kerning, type area tool and type on a path.
On Monday we will begin an assignment where we will be creating our own Christmas cards. After you learn about some of the options in illustrator you will have some time to take out one of our new cameras and do some outdoor shots for your Christmas card! Take lots so you have a variety to work with. If you are done early you can edit the photos in photoshop (think of the basic workflow types: adjust the levels, colour saturation, and vibrancy)
Try going to this site and doing the kerning challenge!: http://type.method.ac/
On your blog tell me how to you did! Were you surprised at your kerning abilities or inabilities? Have you ever noticed good or bad kerning before? Was the mark you were given at the end?
Tips for success:
No people
Shallow Depth of Field
Be aware of your footprints-don't want through an area that you intend to take a photo of!
Slightly overexpose your images for whiter snow (overexposure is easier to fix than under exposure!)
Break up your shots-don't photograph only snow
Don't worry about the colours being bland-you can add fun colour with text later, a simpler photo is better.
Dont try to keep the camera warm. The cold is fine for the camera but keeping it inside your jacket, etc, can cause a foggy lense
Tuesday, 6 December 2016
December 6th- Vector Self Portraits
Today you will begin a mini assignment creating a monochromatic self portrait with vectors! I will give you a demonstration using the pen tool today in class.
Step 1: Take a selfie on photobooth
Step 2: Open the file in Illustrator
Step 3: Begin tracing yourself with the pentool (use the pencil tool and blob brush if you find that to be easier). Make sure that the fill is set to black.
Step 4: Uncollapse the layers so that you can periodically hide the jpeg and see how your illustration is coming along.
*This is tedious. You will have the full class to work on this portrait, so take your time and do this as accurately as possible. It will make a great profile picture when you are done!
Here is a tutorial to help if you get stuck:
https://www.youtube.com/watch?v=Ny-tnZGP-Zk
Friday, 2 December 2016
December 2nd-Finish Logo Design and Build a Bear!
At the beginning of class today I will give you a demonstration on using 2 very useful tools-the blog brush and the eraser tool. You will use these 2 tools to create your own teddy bear (or another stuff animal) illustrator.
AFTER THE TUTORIAL
1. If you have NOT finished the logo tutorial, do that first. Post your logo onto the blog.
2. When are done your logo, you can create the teddy bear illustration. Take your time with this-create a background if you would like and maybe the bear is holding something?
3. If you finish the above tool, for BONUS please finish your landscape illustration and post it to your blog.
If you finish everything, trying creating a cartoon vector out of a photograph! Choose a photograph of something simple such as a pop can, and turn it into an illustration by tracing it with the pen and pencil tools. You will need to know how to use these skills in order to start your self portrait on Tuesday.
Wednesday, 30 November 2016
November 30th-Illustrator Logo Challenge!
Today you are going to follow along with an Adobe Tutorial and recreate a sophisticated logo! This is not easy, and will take you quite a while. It is 7 short videos totally a time of 22 minutes. It may take you the full period.
https://helpx.adobe.com/illustrator/how-to/design-logo.html?set=illustrator--get-started--ready-to-use
Tips for success:
1. Don't rush. This is not a race but is a learning tool. If you rush and didn't learn anything then the exercise was pointless. Take note of what features you might want to use when designing your own logo in a couple weeks!
2. Watch each video more than once if you need to, pause it while you do your steps, and rewatch it to make sure that you got it right!
3. Use command + tab to toggle between applications.
When you are done post your PNG file to your blog and finish your landscape illustration from yesterday.
Tuesday, 29 November 2016
November 29th-Illustrator Day 1
Hello and Happy Tuesday,
If you still have not posted your final photoshop photo on your blog, do that now.
I would also like you to finish the Illustrator questions from Friday and post them to your blog. If you are done all that you can play on pixie for a few moments until I give you all a tutorial at 2:20 on Illustrator.
AFTER THE TUTORIAL
Please create a cartoon landscape using only anchor points! This can be very basic as you are just learning how to play with anchor points. Post your creation to your blog.
When you are done...try watching this video and be inspired to create a more in depth landscape! Remember the key thing they are doing different is making various layers for each part of the mountain. You can add a new layer at the bottom right of your layers panel.
Detailed Landscape
Friday, 25 November 2016
November 25th-FINAL work period.
Hello all,
What are Vectors?
I'm away today so you are lucky-you can have the period to finish your final photoshop assignment if you need to. It is ESSENTIAL that you e-mail me a copy of your FINAL PSD and post a jpeg of your image onto your blog. No extensions.
If you are finished everything you can begin the work below:
PART II
ADOBE ILLUSTRATOR
To get started, watch the following videos:
What is Illustrator?What are Vectors?
After the videos please, answer the following on your blog in your own words:
1. What is the difference between pixel graphics and vector graphics?
2. What are the advantages of vector graphics?
3. What types of industries do you think would your use illustrator? Do you think any industries would use illustrator more than photoshop?
After you've answered the questions, try creating some pixel art using Pixie.
Here's a great tutorial for advice on how to get started/techniques to try.
When you are finished, post your creation onto your blog.
When you are finished, post your creation onto your blog.
November 16, 18, 21-work periods
These days will be work periods for your Final Photoshop Assignment.
Tuesday, 15 November 2016
November 15th- Photo Surrealism Brainstorming
Hello and happy Tuesday!
Today we will begin brainstorming photos that could work with our final Photo Surrealism project. Please make sure that you start off today by finishing the reflections from last class about Erik Johansson and the short list of ideas that you have for your project.
PROPOSAL
Today you will take some time to research a topic that is of interest to you and you will create a photoshopped imaged of your own that speaks to this topic. Please research a topic that interests you and answer the following questions. Note that is a proposal for your project and should be taken seriously and not rushed :
1. What topic/issue are you planning to address with your photo? Please describe the topic to me in 8-10 sentences, providing a link to a website that provides more information (wikipedia is fine).
2. Please describe the photo you are planning to create in detail. Please explain some of the steps you plan to take in creating this image (the tools you will use, etc. ) 8-10 sentences.
3. What are your hopes for your image's effect on the viewer? What questions do you hope it will stir?
4. Are there any other surrealist images that are based on this topic? Please post if so. If not, are there any photos that you are inspired by that you will hope will have a similar inspiration on your viewer.
*Please check our classroom google docs folder for the assignment outline and rubric.
Work Periods: Wednesday November 16th, Friday November 18th, Tuesday November 22nd.
Friday, 11 November 2016
November 11th-Finishing Ferris Bueller and Photo Surrealism
At the beginning of class today you will have the first 20 minutes to finish your Ferris Bueller project and submit the jpeg onto your blog (INCLUDING a photo of yourself).
After you are done, if you have not watched the video from Wednesday you need to do that now.
Please respond to the following reflection on your blog.
Erik Johansson's work can be categorized into a genre of art called Surrealism, and specifically a sub genre Photo Surrealism. Photo surrealism takes the ordinary/known and merges it with the unknown. To do this successfully, it needs to be realistic enough to fool the viewer. Photo surrealism can deal with topics that arise questions in the viewer: social, environmental, cultural, etc.
1. For you, what creates the illusion of realism?
2. When looking at a photo, do you question it's authenticity? If so, when do you so? If no, do you believe photos are always a realistic representation?
3. What are Johansson's 3 rules to success when creating a surrealist photo?
4. Search the work of the most well-known surrealist, Salvador Dali, M.S. Escher and René Magritte. Which artist's works do you find the most interesting-what about it is interesting? Post a photo of the work (photo or painting) with a title and year. What do you think the work is speaking to? (write at least 6-8 sentences here)
PART II
Please watch the following video (only until 2mins and 50s....after that it is just an advertisement for Creative Cloud).
https://www.youtube.com/watch?v=wCdMjR4tYcM
For your final project that we will start next week, you will create a photo realism work that speaks to a current issue. You will take your own photo (or 2, 3 etc) , edit it appropriately in photoshop and then merge it with other sources (filters, adjustments, images from google, etc. )
Today I'd like you create to brainstorm a list of 5 ideas on your blog that you might create for your project. For the rest of the period, you can have fun experimenting with the possibilities of photoshop to see if your idea is "possible" or if you know the correct tools to get the job done.
Check our Erik Johansson's website for more inspiration: http://www.erikjohanssonphoto.com/
Tuesday, 8 November 2016
November 8th-Ferris Bueller's Day Off
Todays's Challenge!
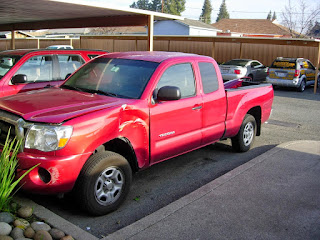
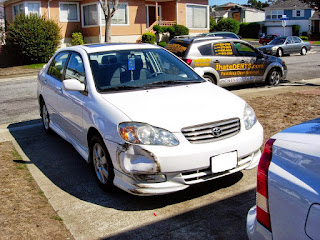
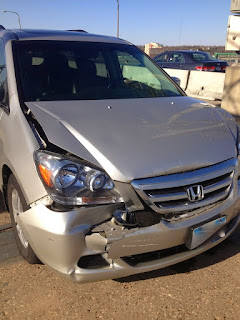
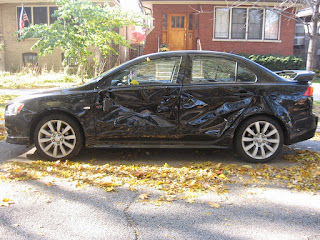
Your parents were away on vacation for the weekend and they decided that you were responsible enough to stay home alone. You decided to "borrow" their car and you got in an accident and decided to hide the car in your garage until you can get it fixed. Your neighbour calls your parents on vacation and tells them they haven't noticed the car in the driveway. Your parents call and demand a recent photo of the car, and to make sure you're not lying, they want you to be in the photo.
Take one of the photos and photoshop out the dents/scratches. Use the clone tool, healing brush tool, patch tool to fix the image! Have someone in the class take a photo of you (or use your mac's camera) that you can add into the photo. Upload your results to your blog.


Please watch this video before Friday:
https://www.youtube.com/watch?v=mc0vhSseGk4
Friday, 4 November 2016
November 4th-Photo Challenges/GIF animation
Today we will finish the mini-assignments that I assigned for Wednesday's class. I will give you a demonstration on the second photo assignment. Both are due by the end of the class!
BONUS
Can you edit an animated GIF? Find a gif online and attempt to edit using the tutorial below! Post your before and after creation to the blog.
http://www.creativebloq.com/photoshop/how-to-customise-animated-gifs-111517958
BONUS
Can you edit an animated GIF? Find a gif online and attempt to edit using the tutorial below! Post your before and after creation to the blog.
http://www.creativebloq.com/photoshop/how-to-customise-animated-gifs-111517958
Wednesday, 2 November 2016
November 2nd
Today you will get the first 15 minutes to finish your animal hybrids. Please make these look as good as possible! My expectations are high: use the clone stamp, healing brush, etc.
When you are finished-please try to figure out the steps to the problem that I answered below. The first photo is the original, and the second photo is the edited version. Can you recreate the same edit? On your blog, post your jpeg of your own edit and give me numbered steps explaining how you did it (just like math class, show your work!). You will need to save the first photo to your desktop for editing. (I will show you the solution at the end of class!)


When you are finished-please try to figure out the steps to the problem that I answered below. The first photo is the original, and the second photo is the edited version. Can you recreate the same edit? On your blog, post your jpeg of your own edit and give me numbered steps explaining how you did it (just like math class, show your work!). You will need to save the first photo to your desktop for editing. (I will show you the solution at the end of class!)


The second challenge for today is to take the photo below and turn it from a gray cloudy sky into a beautiful blue sky with a warm summer feeling! I will give you a demonstration on the new technique that you will need to use before you begin. Bonus if you can figure out how to add some clouds! Be sure to post your edited photo to your blog!


Friday, 28 October 2016
October 28th-Fuzzy Selection and Animal Hybrids
Hello and happy Friday!
Today I would like you to begin by finishing your 2 fuzzy selections of the photos from last class and posting them on your blog.
After that we will start our mid-point Photoshop assignment by creating animal hybrids! Please check the class google drive folder for the assignment outline and success criteria but here is the short of it:
-you must have a combination of at least 3 photos
-you must demonstrate a strong understanding of layers
-you must demonstrate a strong understanding of selection tools
-you must demonstrate a strong understanding of the clone stamp, healing brush, etc.
Here are a few exemplars from years past:


Mini in-class activity: remove the sticker!

Tuesday, 25 October 2016
October 25th-Background changes and fuzzy selection
For the first half of today, you can finish your 3 background switches from last class. Remember this should be well done and not rushed. You will be marked on your accuracy.
After this I would like you watch the following video about making fuzzy selections-something that is very challenging to you and you will need to know how to do for our animal hybrids project.
https://www.youtube.com/watch?t=138&v=8XVATypXio0
After the lesson, please select the 2 photos below and make accurate selections and post them onto a white background and upload to your blog. For a higher quality version of the photo, right click and click "Search Google for this image".
Thursday, 20 October 2016
October 21st- Changing Backgrounds and Removing Content from Photos
Today we will have some fun and we will take photos of ourselves and put them into new backgrounds/situations!
I will give you a demonstration on this and then we will all go and take a portrait of each other. When we come back we will place ourselves in a variety of backgrounds.
If you would like a refresher, here is a similar workflow to what I will be demonstrating in class:
https://www.youtube.com/watch?v=VCqzdSN1aJI
*This video does not show you how to adjust the lighting of the image that you brought into the background. I will show you this in class.
Part II:
After this activity you will erase items from photos you have previous taken and fill it in with the background using a very simple too-content aware filll! If you have any photos with date stamps on it this is a great time to erase the date stamps. You can also attempt to erase a whole person from a photo. I'd like you to do at least 3-4 photos with examples of this and post the before and after.
Wednesday, 19 October 2016
October 19th- Colour Isolations
Today I am going to give you a demonstration on doing colour isolations and then you will go out today and take 4-5 of your own photos that have a strong sense of colour. Try to isolate the coloured object so your photo is not too busy.
Here is an example of a colour isolation.

After you've taken 4-5 successful photos, you can do colour isolations for these photos and upload them to your blog. Zoom in close so that your edges are clean and you are not overlapping into other colours. If you finish your 4-5 and have posted them to your blog, try selecting one of the objects that you have isolated and change the colour! Here's an example:


Tuesday, 18 October 2016
October 18th- Layer Masks
Hello and Welcome!
Today I'd like you to respond to the following on your blog:
1. Before you knew anything about photoshop, what were you impressions of this program?
2. Now that you've had a couple days of introduction to the program, what do you think? Are you enjoying the capabilities of this program? Is it fun, boring, etc.
3. What types of issues should we be concerned with when using photoshop and why? I.e. copy right, respect, influence of the media, etc.
When you are done the above, you can finish your hamburger drawing and find a photo from google images and play with the filter options. We are going to explore layer masks today.
I will teach you how to apply layer masks appropriately and I would like you to create the following AFTER THE LESSON and post them to your blog:
1. Single Focus Image with a Gaussian Blur
- find a photo on google images (high resolution)
-duplicate the layer
-add a Gaussian Blur
-add a layer mask
-paint in black on the mask to reveal the lower layer
2. A Lens Flare Affect
3. A "melting" image.
4. A unique layer mask of your own!
When you are done, continue playing with the filter options in Photoshop and explore the capabilities of filters.
Friday, 14 October 2016
October 14th-Basic Workflow & Creating Layers
Today I will review what we started last class: a basic workflow to adjust the tonality, colour balance, and vibrancy. After this you will need to edit 3 photos and post them to your blog-at least 2 of these photos must be your own.
Next I will give you a demonstration on the importance of layers by creating a sandwich drawing. After you will be required to recreate your own and save it on your SD card for me to view as a PSD file so I can tell that your layers are movable. Have fun with your drawing and give it some detail!
Tuesday, 11 October 2016
October 11th-Photography Project Due & Introduction to Photoshop!
Hello and welcome back, I hope you all enjoyed a restful long weekend.
You will have the first 15-20 minutes to finish your photo edits in iPhoto and submit your edited photos on your blog (with your reflection AND photo details (iso, aperture, shutter speed) as well as create a folder on your SD card with your original photos and your edited photos. This allows me to see them in a higher resolution.
If you are done and waiting for the rest of the class, open upon Adobe Photoshop under applications and drop one of your photos into photoshop and begin playing and exploring what photoshop can do.
ASSIGNMENT IS DUE AT 2:20 SHARP
PHOTOSHOP
We will begin by watching the following video as a class.
What is photoshop?
https://helpx.adobe.com/photoshop/how-to/photoshop-cc.html?set=photoshop--get-started--essential-beginners
After the video, I will demonstrate a basic workflow that you can use to improve your photos. This is a basic but very handy thing to know how to do. We will start with the most important and work to the least important: Tonal Adjustments, Colour Balance, and Vibrancy. When I'm done the demonstration you can edit 3 photos to enhance them. Take your time with this and make sure they are the best that they can be. At least 1 of the photos must be your own but you are able to take the other 2 from google images (assuming they're serious photos and not of famous people, memes, etc. )
Post your before and after photos to show me that you know a basic workflow in photoshop!
Friday, 7 October 2016
October 7th-Final Photography Assignment, Last Day
Hello everyone!
Today is your last day to work on your final assignment, for a reminder read the post above.
How to submit your photos:
You will submit your 10-15 edited photos on your blog as well as a written reflection responding to the following questions. You should answer at least 3 sentences pers question, and should be full sentences in a formal written style. :
What theme did you choose for your photography assignment, and why did this theme stand out to you?
Do you think that you were successful in conveying your theme to the viewer, why or why not?
Technically speaking, are these photos some of your best work? Why or why not?
If you were to do anything over again, what would you do differently?
Finally you must also submit your original high resolution photos to me via your SD card. You must make a folder on your SD card that says Final Photography Project and place all your photos into this folder. On your SD card I will be able to see all of your originals, plus your edits in high resolution.
Congratulations-you are finished!
On Tuesday we will begin our Photoshop unit so if you are finished you can open some of your original photos up in photoshop and begin exploring with this amazing program!
Wednesday, 5 October 2016
October 5th-Final Assignment
Hello,
Sorry I am away today-you will have your conversations with me about the triangle of exposure on Friday (I'm sure you are all very sad about that :) ).
Today I would like you to begin your final photography assignment. I have shared the assignment outline with you on our Google Docs class folder, as well as the success criteria. Essentially you will take 10-15 photos within a self-chosen theme. You will have today to decide on your themes (here's a list of ideas to get you thinking about what theme might interest you https://photographyicon.com/photography-themes/).
At the end of today I recommend loading your photos into your iPhoto account so that it will not take you too long on Friday (if we are all trying to upload 15 photos it could be problematic). The assignment is due Friday, and with the editing that will be involved with this many photos AND your conversations with me about exposure you won't have a lot of time. I recommend trying to capture AT LEAST 10 GREAT photos today so that Friday you only need to take 5 more, edit these photos, and have a conversation with me.
*Check our Google Docs folder for the assignment-if you would like it in hardcopy you could print it to the library lab.
*Ms. Wiebe has all of the cameras, NEW batteries, and your SD cards.
Tuesday, 4 October 2016
October 4th-Shooting on a Selected Theme
Before we begin class today, take some time to reflect on the manual photos that you took last class and answer the following questions. *MAKE SURE YOUVE UPLOADED ALL YOUR PHOTOS AND INCLUDED THE PHOTO DETAILS, i.e F4.5, 1/250, ISO 800
In 5-8 sentences respond to the following:
Are you satisfied with the overall look of your photos? Did they turn out too dark, too blury, too bright, etc. ? Did you enjoy the process or was it a balancing act that was hard to juggle? Did your subject matter suffer as a result, i.e. boring photos, boring composition, etc. What has been your favourite mode to shoot in?
Starting tomorrow you will be assessed on an oral conversation you will have with me when we discuss the triangle of exposure. You will need to explain the significance of this triangle, what it means, and give advice to common photography issues.

TODAY:
Today is your last day to experiment with photo taking before our final project that we will start tomorrow. Today you will be assigned a random theme and will need to take photos within that theme. You will be assessed on your photos connection to the theme, their exposure, composition, and their adherence to the elements and principles of design. You will need to take 4 photos that are SUCCESSFUL, and edit them accordingly and submit them on your blog. You will be assessed on the success criteria discussed in class.
Friday, 30 September 2016
September 30th-ISO
Today we will spend the first part of class talking about lighting equipment and I will have you help me with a project in the lighting studio.
After that I will give a short lesson ISO and you will get the opportunity today to shoot in a fully manual setting: ajdusting the entire triangle of exposure-aperture, shutter speed and ISO.
After that I will give a short lesson ISO and you will get the opportunity today to shoot in a fully manual setting: ajdusting the entire triangle of exposure-aperture, shutter speed and ISO.
Tuesday, 27 September 2016
September 27th- Aperture
Hello and happy Tuesday!
Today we are going to talk about Aperture. I will do a lesson on aperture and depth of field.
After the lesson I want everyone to go out and take 10 photos, 5 with a shallow depth of field and 5 of high depth of field. When you return, please do some adjustments in iPhoto. I suggest adjusting the levels to increase your white or black if necessary (remember every photo should have a true white and a true black), and perhaps the exposure, highlights and maybe black and white.
When you are done, post all 10 on your blog WITH YOUR F STOP NUMBER.
BONUS**
If you are done go to this link, National Geographic's Photo of the Day and choose your favourite photo and tell me why it's your favourite, what is interesting about the photo, and what settings you think the photographer used (i.e. what is your guess for aperture and shutter speed).
http://www.nationalgeographic.com/photography/photo-of-the-day/2016/9/kiev-paper-boat/
Friday, 23 September 2016
September 23rd-Shutter Speed Part II
Welcome back and happy Friday!
Last class we focused on shutter speed and experiment with shot types and settings. If you did not do this on Wednesday, please upload your photos to your blog and label them A: and the shutter speed you used, B: and the shutter speed you used, and C: shutter speed you used. There should be 6 photos in total (and most of them likely didn't turn out).
Step 1: Upload and label photos with the shutter speed that you used
Step 2: Explain why you don't think your photos really turned out-was your shutter too fast, too slow, was your ISO setting not high or low enough?
Step 3:
I'd like you to go back out and retake the same photos-this time do not go to extreme ends of the shutter speed wheel....do one that's slightly faster and one that is slightly slower. Remember that if your photo is too bright, you should lower your ISO, if your photo is too dark then you should raise your ISO. This will be essential in taking photos that actually turn out. AFTER you've taken the same photos, take 1 photo of each scenario on AUTO.
Your goal by the end of the class is to take the same sets of photos but this time they should turn out somewhat decent.
Step 4:
Post your photos on your blog, label them with the shutter speed AND the ISO that you used (as well as the auto photo and the shutter speed/ISO of the photo).
Step 5: Respond to the following question:
1. Did your photos turn out better this time? Why do you think that they did or why do you think that they didn't?
2. How does your photo compare to the AUTO setting photo that the camera took?
Step 6:
When you are done everything else for today, please complete the following survey. Next week is Spiritual Emphasis week and the topic will be on Social Media: The Good, The Bad, The Beautiful. This survey is anonymous but will help to inform our speaker on things that are relevant to Rockway.
https://www.surveymonkey.com/r/Rockway
Step 7:
If you're done EVERYTHING, go to the National Geographic Photohgraphy page and explore all the amazing photos. If you click on the photo on the bottom right it will tell you the setting that the photographer used.
http://www.nationalgeographic.com/photography/
Wednesday, 21 September 2016
September 21st: Introduction to Shutter Speed
Hello and welcome back!
Before we begin today, please fill out this quiz on Resolution. Please complete this on your own, with no talking please. If you are unsure about the answers, refresh yourself on the article that you read yesterday:
If you are done the quiz early and are waiting for the lesson to start, then google Shutter Speed.
AFTER THE LESSON:
In your own words, explain what the function is of the shutter speed and how you can use it in your camera.
PHOTO EXPERIMENTATION:
You will go outside today with a pen and a piece of paper and take the following 6 photos. You MUST RECORD the shutter speed that you used for these photos.
I would like you to work with a group of 2 or 3 and do the following:
A.) Take a photo of a water photo running...one of a slow shutter speed and one on a fast shutter speed.
B.) Take a photo of someone running through the frame, one on a fast setting and one on a slow setting.
C.) Have one person sit in a chair with the camera focusing on their feet while the other group member pushes them in the chair (in the lab). Take on a low setting and one on a fast setting.
HINT-IF YOUR PHOTOS ARE TOO DARK, USE A HIGHER ISO. IF YOUR PHOTOS ARE TOO BRIGHT, USE A LOWER ISO.
Tuesday, 20 September 2016
September 20th: Resolution
Hello,
PART 1:
Today we are going to talk a little about pixels and resolutions and how it relates to photography and printing.
Please read the following article and answer the questions below in full sentences. Tomorrow you will start the class with a small quiz on resolution so that I know you fully understood the article.
http://www.vividlight.com/articles/3116.htm
1. What is "resolution"?
2. What is a megapixel?
3. If, at it's maximum, a camera produces an image that is 1600 x 1200 pixels, we would consider it a _______ megapixel camera.
4. What are three advantages to having images with a higher resolution?
5. Research a camera, phone, iPod, etc. that you own-what is the mega pixel rating on this device? Does this surprise you?
PART 2:
When you are done, google the triangle of exposure. We are going to begin talking about this tomorrow. Post an image of the triangle and an explanation of what it is in your own words (Cite your source by copying and pasting the URL!!!!)
PART 3:
If you've done everything above, go outside and take a couple more photos that focus on the elements of design from last class. This time I'd like you to consider the rule of thirds when you are taking your photo as well. Post your photos from today on your blog (max of 3) and explain what element you were focusing on in the photo.
Friday, 16 September 2016
September 16th: Elements of Design
Hello and Happy Friday! It is a beautiful day outside so we are going to spend another day outside taking photos :)
Last class you took some photos using the rule of thirds, you should all have some comments on your photos for me now if you e-mailed me the link to your blog. If you have not done that you will need to do that A.S.A.P.
1. Short Lesson on the Elements of Design that you can use to improve the composition and subject matter of your photos.
2. Use Google Search to find an example of a photo that depicts each of the elements we discussed in class. Make sure your images are high resolution only (larger than 1024 x 768):
colour (contrasting and analogous)
lines
shape (as in two dimensional such as a shadow, silhouette, etc.)
form (emphasis the 3 dimensional aspect of the subject matter)
pattern
symmetry
texture
-Upload these to your blog and label them the element that you think it represents
3. Go out and choose a minimum 4 of the elements to focus on and take QUALITY photos of these elements. It is recommended that you go OUTSIDE-indoor photographs are never as interesting. Remember-no classrooms, no resource room, no office/student services, no gym and no parking lots.
4. Upload a minimum of 4 photos to your blog, and explain what element you chose, what about the photograph represents that element, and if the photo turned out the way you envisioned.
Tuesday, 13 September 2016
September 13th: How Photography Connects Us
Hello and welcome back,
I hope you had a restful weekend. Today we are going to spend the first half of the class inside and the second half outside taking photos and uploading them to our blog. The first is you are going to watch a TEDTALk on your own about how Photography Connects us and then you will answer a few questions:
PART A:
David Griffin-How Photography Connects Us
(David Griffin is one of the world's most successful food photographers)
1. How do you think photography connects us?
2. What was the most interesting image for you and why?
3. How is photography more than just pretty pictures?
PART B:
Next go to National Geographic Photo of the Day and look through the photos from September (or further if you are interested).
1. Find a photo that tells a story. Post a link to it on your blog with the reference of the Photographer's name, and title of the photograph. Explain why you think the photo tells a story, and what about the photo "caught your eye".
PART C:
After you are done all of that, sign out a camera and go outside and take as many shots as you can that follow the rule of thirds. DO NOT DISTURB ANY CLASSES OR RESOURCE PERIODS. You will upload your 5 best photos to your blog at the end of class. At least 1 of these photos should be a portrait, so you should talk with a classmate and take each other's photos. YOU MUST STAY ON SCHOOL PROPERTY AND OUT OF THE PARKING LOT. All the composition work must be done on your camera, do not crop or edit your photos.
Tips: Use the horizon line as a guide in your photos, and you can use the grid display overlay on your camera. Take a wide variety of shots. Outdoor shots are generally more successful than indoor shots.
Return to class before 3:05.
Friday, 9 September 2016
September 9th 2016
Welcome back!
Last class we were interrupted so today I will give you the first 15 minutes to finish creating your blog, answering the questions from yesterday and customizing your blog. Take a photo of yourself on photobooth and have some fun exploring with filters/adjustments in iPhoto.
If you finish that and are waiting for the lesson, google rule of thirds and tell me in your own words, what the rule of thirds is in a few sentences. Copy & paste the link that you used so that I know you didn't copy word for word.
*LESSON ON RULE OF THIRDS*
After the lesson, I'd like you to take the following photos are crop them 2 different ways to follow the rule of thirds and post them on your blog.
Wednesday, 7 September 2016
Wednesday September 7th
Welcome to Communications Technology!
In this course I hope you will learn a lot and discover some new technology
STEP 1:
Activate your Rockway Google Account
1. To activate your Rockway Google account, go to www.Google.ca and click on Sign In.
2. Use "student id@student.rockway.ca" as your username, and "password" as your password.
3. Change your password to something that you will remember, and agree to the terms and conditions.
STEP 2:
Create a blog on Blogger.com
If you finished all of this, you can spend some time modifying your blog by:
In this course I hope you will learn a lot and discover some new technology
STEP 1:
Activate your Rockway Google Account
1. To activate your Rockway Google account, go to www.Google.ca and click on Sign In.
2. Use "student id@student.rockway.ca" as your username, and "password" as your password.
3. Change your password to something that you will remember, and agree to the terms and conditions.
STEP 2:
Create a blog on Blogger.com
1. Once you are logged into your school Google account, go to Blogger.com.
2. Create a new blog. Have fun customizing it...please include your name in the blog title or description.STEP 3:
IMPORTANT!
Once you have published your answers in a post, please email the URL (web address) of your new blog to Ms. Matthews.
2. Create a new blog. Have fun customizing it...please include your name in the blog title or description.STEP 3:
IMPORTANT!
Once you have published your answers in a post, please email the URL (web address) of your new blog to Ms. Matthews.
Instructions are below:
1. Open a new browser or tab, and go to Google.ca.
2. Login to your account.
3. Click on the "Mail" link on the menu at the top.
4. Create a new message addressed to "traceym@rockway.ca" .
5. Cut and paste the URL from your blog into the message, and click "send".
2. Login to your account.
3. Click on the "Mail" link on the menu at the top.
4. Create a new message addressed to "traceym@rockway.ca" .
5. Cut and paste the URL from your blog into the message, and click "send".
STEP 4:
- State your name, grade, country of birth.
- Why did you take this course? What are your goals in this course? What have you heard about this course?
- What experience do you have with digital photography? Do you have access to a camera? Explain.
- Do you have any experience with photo editing? (e.g. iPhoto or PhotoShop)
- Have you ever created and edited your own videos? Please explain (what the video was, what programs you have used, was there audio involved, etc. )
- Describe any experience you have with graphic design (e.g. Adobe Illustrator/inDesign or similar programs).
- What platform are you most familiar with: Mac or PC?
- What do you spend most of your time doing online? Please describe.
If you finished all of this, you can spend some time modifying your blog by:
- adding some information about YOU in your profile
- changing your blog template/adding gadgets/uploading images
Subscribe to:
Posts (Atom)